Removing and Reinstalling the Centerboard...
By Yourself!
We all are familiar with the necessity of centerboard maintenance. Some of us perform this task faithfully; others try to ignore it until the centerboard rusts away completely until there is nothing left. The largest hurdle is, without doubt, removing the centerboard and putting it back in. This page will demonstrate that it is possible to do both yourself with a minimum of effort.
DISCLAIMER: While I personally have had success using this method, one should never undertake major repairs without the presence of another adult in case an emergency situation should arise.
The Tools
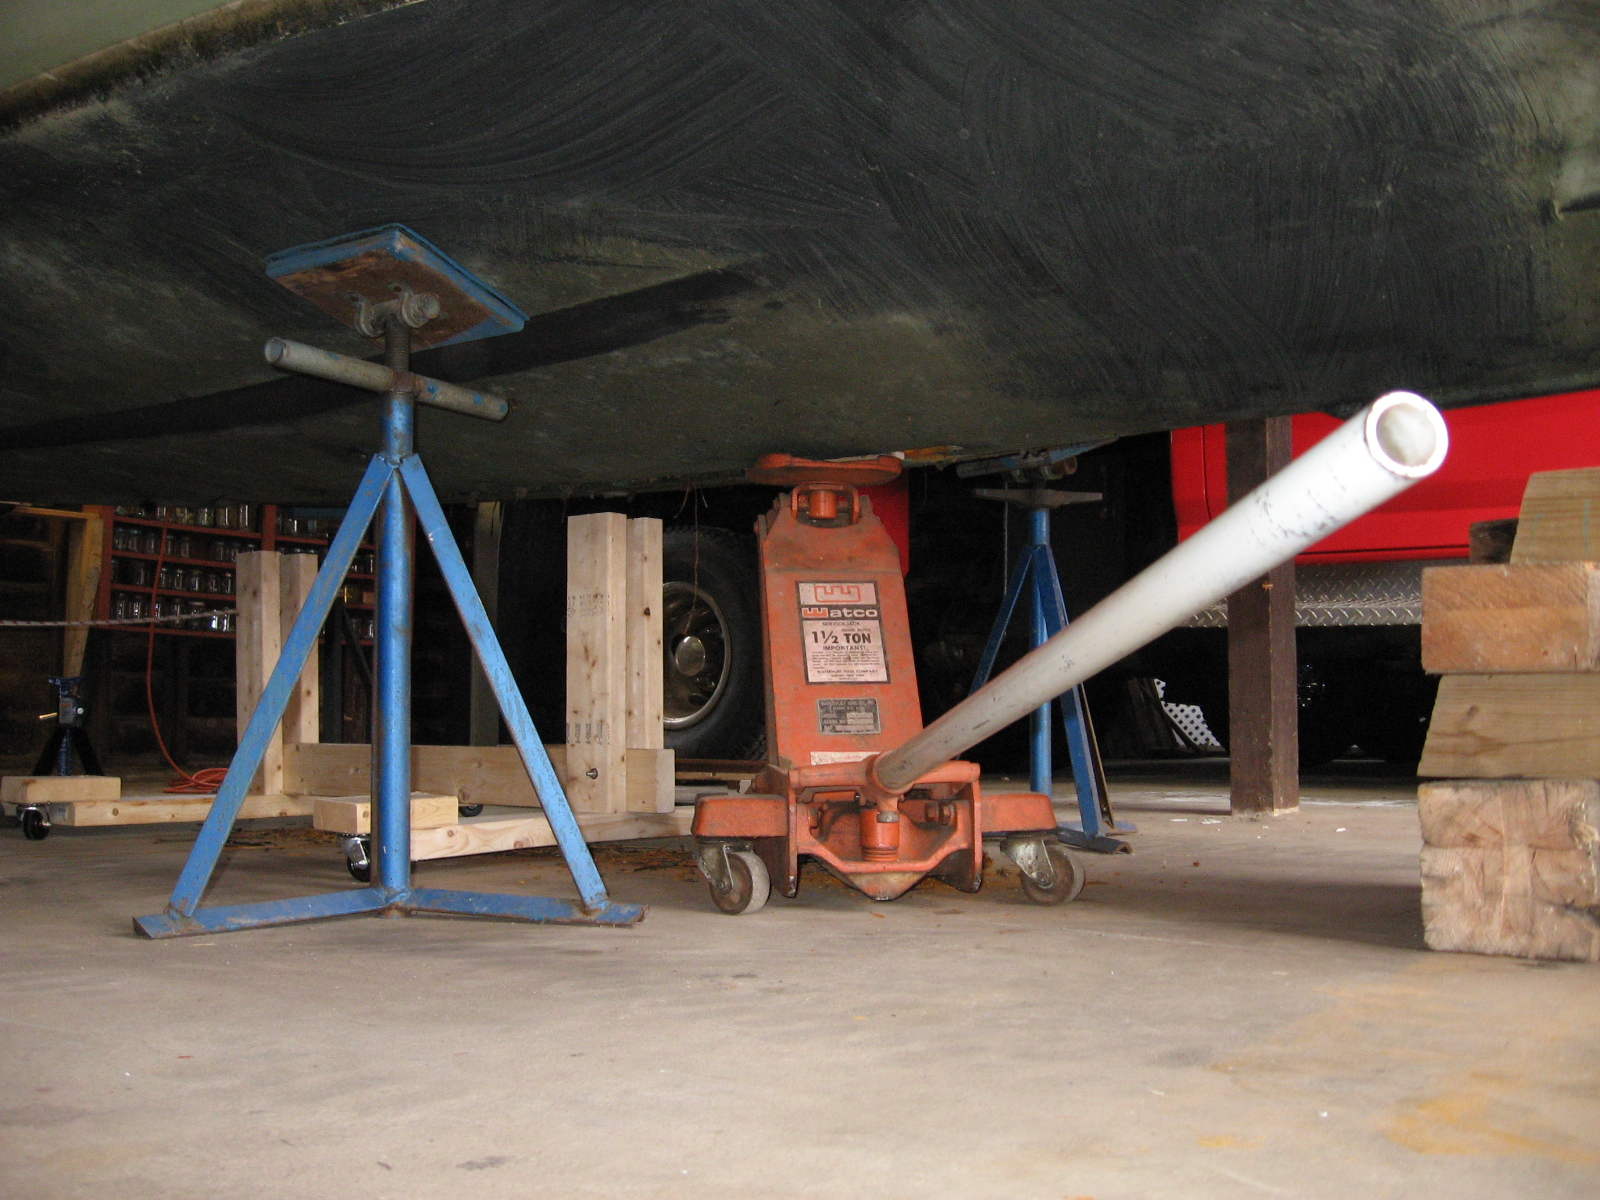
I think it's fairly obvious that the boat either needs to be supported on jack stands or suspended from the chainplates or with a sling. No trailers. That being said, you need:
• Wrenches for centerboard nut and bolt
• Car jack (I used a 1 1/2 ton "Watco" jack). This is positioned underneath the front of the centerboard roughly where the pivot bolt is located.
• Home-built cradle (more on that below)
• Cable cutters
The Cradle
This is the device that keeps the centerboard from falling over, and it makes it easier to move around the shop or the garage. It's made out of 2X4s with rubber casters on the bottom, and the centerboard will be lowered between the vertical supports. You can see how I attached the casters in order to keep the cradle as low as possible.
Before I constructed this, I took several measurements: the length of the centerboard slot (60"), the height between the boat and the floor (20"), and the height of the jack in the "down" position" (5"). I made this cradle 40" long so I would have plenty of room to position the car jack in the front. While I wanted to keep the cradle low to the floor, I wanted to make sure it would end up being slightly taller than 5", so when the jack is fully lowered with the centerboard on it, there would be just enough room to pull the jack out from underneath. It came to 6" (3 1/2" with the 2X4 on edge (I'll call it the "horizontal support"), plus 1 1/2" with the flat 2X4 (I'll call those the "cross beams"), plus 1" for the casters).
For the vertical supports, I measured to make sure that it could fit underneath the boat, so I went for a total height of 19". Therefore, subtracting the height of the flat 2X4 (1 1/2") and the casters (1"), I cut the supports to 16 1/2". I bolted them through the 2X4 horizontal support with just two 5" bolts - one on the front and back end - that's all you need. To be fair, this specific height didn't really matter all that much, because I ended up jacking the boat up a few more inches so I could get the board out after it was lowered. This was just a good starting point, and it worked very well.
For the width of cross beams with the casters attached, I just guessed and made them 32" wide. In retrospect, I wish I had made them slightly shorter - I could have cut them to the right width so it would fit between my jack stands. I ended up having to move the jack stands to get the cradle out afterward.
The Process
1. First, put a piece of hardwood on the jack - this must be small enough to fit just inside the centerboard case opening to put pressure on the front of the centerboard so you can knock out the pivot bolt from inside the cabin. The piece of wood in this picture is slightly too small - I ended up using a larger piece of wood later on that you'll see in other pictures, and that was 1" X 1". Perfect. I have it on an angle like this as I'm positioning the jack in on an angle - this just makes it easier to push in and pull out.
2. Next, position the jack and the cradle underneath the boat. Crank up the jack to give the front of the centerboard enough pressure to knock the pivot bolt out, then climb onboard and take out the bolt. Here are a few pictures from different angles.
3. While you're onboard, lower the back of the centerboard down just a little using the centerboard pennant line and hop out to make sure the cradle is lined up properly.
4. Slowly lower the front end of the centerboard with the car jack and the back end with the pennant line, alternating to keep the centerboard as level as possible; otherwise, the front end might slide off the jack if there's too much of an angle. Don't try to save time by doing both at once! Take your time and make sure everything is lowering safely and smoothly. This process took just a little more effort for me, simply because the centerboard was so rusty that it didn't want to come out. That's why you'll see the 1" X 1" piece of wood on the jack is turned - no specific reason for that, it just did it on its own. I ended up going back into the cockpit and pulling up and down the centerboard line a bunch of times to free the centerboard. That did the trick. After it had fallen out a little, I continued to lower it alternating between the jack and the pennant line the rest of the way.


5. Cut the cable, then move the centerboard out! It's easy with the cradle. For me, I had to jack up the boat another 4" or so for the trailing edge of the centerboard to clear the slot. No big deal. I also had to move one jack stand to get it out; like I said above, if I had made the cross beams just a little shorter I wouldn't have had that problem.
So there you go! There's no lifting involved, no danger of crushed fingers or toes, I can wheel it anywhere I want it to go, and I was even able to reinstall the centerboard by myself simply by reversing the steps outlined above. When doing that, it's difficult to line up the centerboard the bolt hole on the first try, but once it's close, you can use a thick screwdriver or another kind of tool inserted through the bolt hole to to push the board into place exactly where you need it.