Transom Repair
Spring, 2008
My initial inspection of Orion in the spring of 2007 revealed a slight crack on the transom, right by the backstay chainplate. Yes, a small chunk surrounding the chainplate was about to fall off, but the crack extended from the starboard side of the chainplate almost to the aft quarter. The hull-to-deck joint was starting to separate a bit. I didn't address this issue until the winter, when I removed the stainless-steel transom rubrail and noticed the crack had become substantially bigger.
I had been using WEST System Epoxy for a number of things, including fairing and barrier-coating the centerboard, bonding the cabin sole supports to the cabin floor, and coating the wood pieces before applying varnish. I had yet to use it with fiberglass, and I did have my suspicions. There is an on-going debate as to whether it is appropriate to use epoxy with boats made with polyester resin, but the Gougeon brothers at WEST convinced me it would be very appropriate, if not somewhat better. So WEST System Epoxy it was.
This repair, with all things considering, was one of the easier tasks, and quite rewarding. Step one was to grind away the gelcoat down to bare fiberglass so the epoxy resin had something to which it could adhere. Step two was to lay a 1 1/2"-wide piece of fiberglass tape across the top, after measuring and cutting a small hole for the chainplate. Step three was to apply the epoxy and make sure there were no air bubbles or dry spots. After letting it cure a while (but making sure it was still tacky), step 4 was to apply a second, 2" piece of tape on top of the first. More epoxy on top of that, a little smoothing out here and there, and that was that. Sure, it was a little messy, but there's no way of getting around that.


Once everything was had dried, I cut off the excess tape and sanded everything to make it smooth and even. Then, once I painted the whole boat, the repair nearly disappeared. I say "nearly" because you could still see the woven fiberglass pattern through the paint as I did not put any gelcoat on the finished product, but guess what - I think it came out great, and it's a lot better than before. Some have questioned my decision to fiberglass the joint without clamping it firmly together, but I decided that would be much more trouble than it would be worth. It would have made applying the tape more difficult, and, since there isn't much pressure exerted on the hull-to-deck joint there, I didn't think it would cause a problem. Since then, I'm pleased to say the repair has held up perfectly, and it looks just fine, too.
Spring, 2015
At the end of the 2014 season, I noticed that the bottom edge of the motor mount bracket was starting to dig into the fiberglass. When the boat was hauled out and I took the bracket off, I saw there was a slight crack all along the bottom edge where the bracket was, and the back of the transom itself had pushed in by as much as 1/4". Yikes. There is no "core" inside most of the transom - it's only a thin layer of fiberglass - there isn't a whole lot of support for a 60-pound motor. With all that weight constantly pushing down, coupled with the jostling the motor receives while sailing and even on the mooring, it's easy to see how the transom certainly takes some abuse. Plus, the motor bracket itself was starting to get a little loose at the pivot bolts, so I'm sure the added sloppiness of the motor clunking around more than usual exacerbated the problem. The damage itself was significant enough that I needed to address it over the winter. My plan was to reinforce it with more fiberglass and make it fair again with West System epoxy.
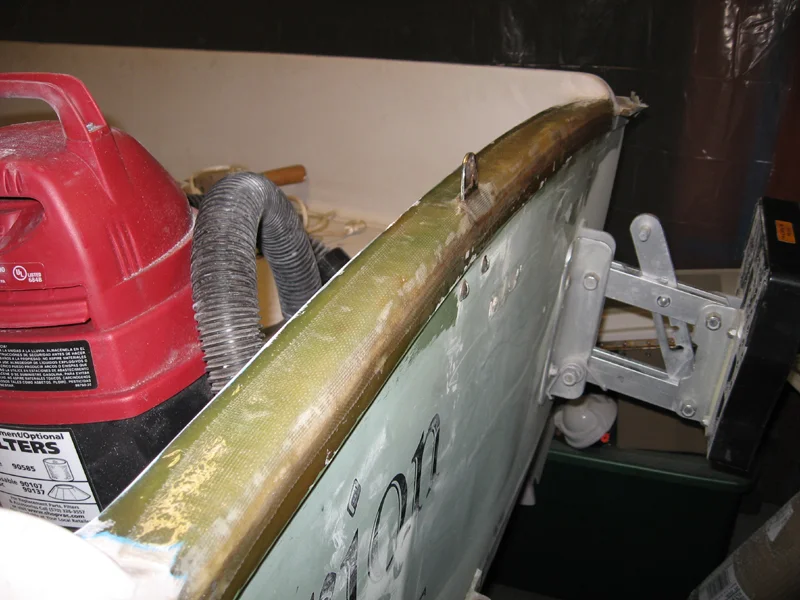
Since there is a plywood core which runs down the middle of the transom (as a big backing plate for the gudgeons), the middle remained fair. So, holding a straight edge from the middle of the transom to the starboard edge, I slid it up and down, making marks wherever I saw the transom had started to push in. After inspecting all around, I simply connected the dots which showed me exactly what the indentation looked like. I was surprised at its shape; I was expecting more of a circle centered around the bracket. What I got was a strange oval-ish shape. No matter - it needed to be reinforced and faired, so I took a sanding disk (60 grit, I think) and went to town, sanding off all the gelcoat in order to get to bare fiberglass, just like I did repairing the top of the transom in 2008. It made a huge mess, which made me glad I did it outdoors and was wearing protective clothing and a mask. Even after sanding, you can clearly see the crack at the lower edge.
After that, I cut out three pieces of thick fiberglass cloth, each one a little smaller in size (I just guessed at the sizes). I then brushed 105/205 West System epoxy over the sanded area with a disposable chip brush and used the same mixture to wet out the largest cloth first. (I had put wax paper on a table so the wet-out cloth would come off it easily.) I then brought the wet-out cloth over and carefully placed it on the transom, using a plastic, flexible squeegee to sure it was properly saturated all over with no air pockets. I repeated it for the remaining layers. Once the epoxy had cured and dried, I sealed it by scrubbing off the "anime blush" (a wax-like film that sits on the surface of cured epoxy resin) with a Scotch-Brite pad and water, drying the area, and then sanding it with 80-grit sandpaper and brushing on another application of 105/205. I actually did this sealing process twice more to make sure everything was sealed completely.
When the final epoxy sealing was completed and scrubbed of blush, I once again sanded it with 80-grit paper and applied another coating of 105/205. As soon as I had done that, I mixed more 105/205 in a container along with 407 fairing compound until it was the consistency of peanut butter. I actually used a lot of 407 - much more than I thought I would. (I actually mixed too much 105/205 all at one time. I ended up throwing out a lot of epoxy and compound simply because I had mixed too much at the start. It's better to start small and mix more if needed.) Once the peanut butter consistency was reached, I again used a plastic squeegee to apply it over the transom to make it flat. After the first application had dried and was scrubbed of blush, I realized I needed a second application in some spots that weren't quite fair. So, I sanded it again and applied more 105/205/407. Once I got it as fair as I could, I waited until it was dried before I scrubbed off the blush and sanded the whole thing fair with 150-grit sandpaper, first on a random-orbital sander and then by hand with a fairing board. Once the transom was fair and smooth, and sealed the whole thing three more times. Now, it just needed some paint to look normal again!
Although I only needed to re-paint the transom when I was finished, I ended up painting the whole boat, just to make everything blend in nicely. I then re-drilled the old holes, but I actually raised the motor mount bracket up a set of holes so the pressure would be a little higher and in the area more heavily reinforced with fiberglass. Hopefully, the problem is fixed, but if I see it starting to sink in again, I'll have to consider some kind of external backing board. I wanted to avoid doing that simply for aesthetic reasons, but we'll see how everything looks at the end of this season.
Another project complete!